When we bought our house almost 8 yrs ago I knew that I was going to change many things. One of the first things we changed was the kitchen and bathroom. We have slowly done other projects over the years. The one thing that I have always wanted to change and have from day one is the glass block beside my front door.
I mean who puts glass block there anyways? It is one of those things that whenever I see it and I see it every day, I kinda cringe. I know glass block has it's uses but beside my front door is not one of them. What were they thinking? I know exactly what I want to put there- an oval window with clapboard type siding. And of course the window will have awesome thick white trim.
Here is the offending side window in all of it's glory!!

So there it is. I mean..... REALLY!!! Someone thought that glass block would look GREAT!! I mean, it has NO relation to anything. I can't wait to change this puppy. So I have provided some lovely eye candy oval window style. Enjoy:

This is exactly what I want it to look like inside. I love the use of the bead board and the white trim around the window.
The following 7 images are from Architect Peter Cadoux. I have found a new design crush! His houses are redonkulous- and I mean that in a good way. His use of trim is amazing.


Or maybe this type of Wainscoting with the Oval window would work as well. Hmmmm..........

How lovely would it be to have this window in your office??

I have always loved a window seat. I love a window seat on a landing even more! And the fact it is an oval- OY!!

Great nautical style bathroom! I love how the Oval Window has a custom cover!
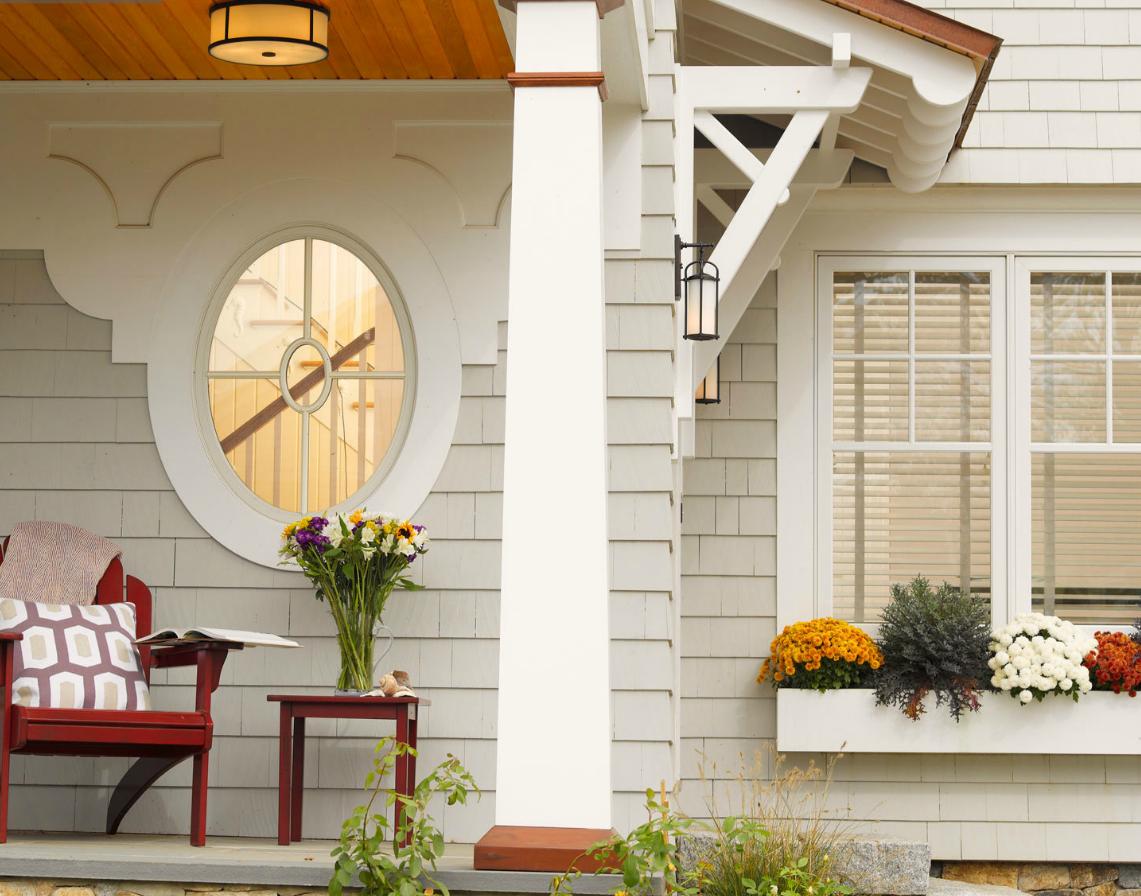
This is such a beautiful shot. I love how they have used darker trim for added emphasis.

How quaint is that window up at the top of the peak! It is so sweet!

I think this is one of the loveliest benches I have ever seen. I love how they have disguised heating in the bench with screening for ventilation. The gray just adds to the overall softness. And the Trim!!! Oh-and the window is pretty awesome too!

What can I say about this except- Yes please! The trim, windows and roof line all make for an amazing elevation.

You don't see that too often- an Oval Window that can open! Imagine!

This is one instance where I think white trim is called for- it contrasts beautifully with the green siding. I am usually a big fan of trim that is painted some other colour than white.

Absolutely gorgeous. That eyebrow window and the two flanking oval windows give this front exterior a really great elevation.
 How nautical can you get?? Love it!
 I love all the different roof lines in this one- makes it very interesting-as does the beautiful trim and oval window.
 How gorgeous is this bathroom? The trim, wall colour, marble and window all add up to a pretty special space!
 Stone, siding and Oval Window= amazing!
 The dark wall colour really emphasizes the trim of the oval window!

How lovely is that Oval window in that gorgeous kitchen?
 I know that these windows have absolutely nothing to do with my situation but I just HAD to put it in. If Antonio Gaudi were to ever have built a firehouse I think this would have been it!! AMAZING!!

I just love an Oval Window in a stairway! Don't you?? It looks especially good here. Such a lovely shot!

Very fancy! But I have to say that there is a lot of classic details here- the Oval Window of course, the black and white floor, the curving staircase. All amazing!
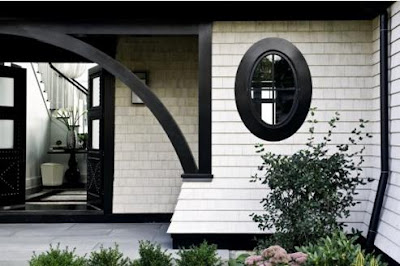
 This is very classic. This is what I would like the exterior treatment on my house to look like around the door area in this pic- the window and the siding.
 Gorgeous dining room. I really like symmetrical design- just one of my things I guess.

I think what really caught my eye here is the window, the trim and the colour of the room. This wall colour is one of my favourites- looks something like Wythe Blue HC-143 B/M maybe??
Well that's just a few great examples of Oval Windows. Now if only I can find a window that fits not only my house but fits my budget!!
Have a great day everyone!!
I mean who puts glass block there anyways? It is one of those things that whenever I see it and I see it every day, I kinda cringe. I know glass block has it's uses but beside my front door is not one of them. What were they thinking? I know exactly what I want to put there- an oval window with clapboard type siding. And of course the window will have awesome thick white trim.
Here is the offending side window in all of it's glory!!

So there it is. I mean..... REALLY!!! Someone thought that glass block would look GREAT!! I mean, it has NO relation to anything. I can't wait to change this puppy. So I have provided some lovely eye candy oval window style. Enjoy:

This is exactly what I want it to look like inside. I love the use of the bead board and the white trim around the window.
The following 7 images are from Architect Peter Cadoux. I have found a new design crush! His houses are redonkulous- and I mean that in a good way. His use of trim is amazing.


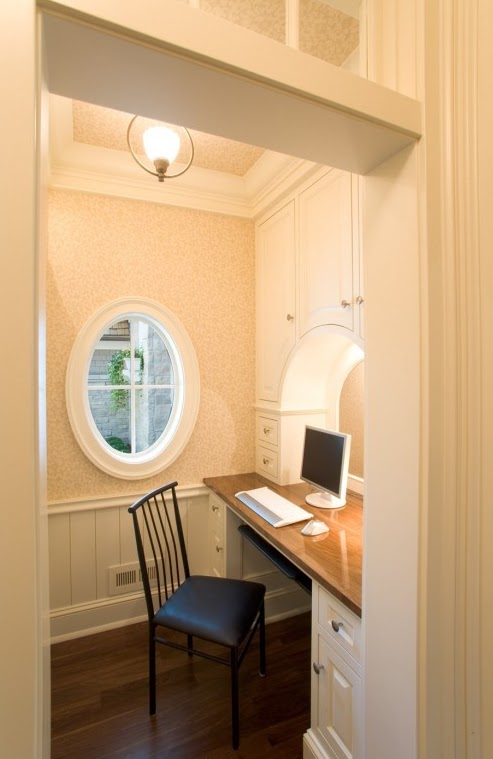
How lovely would it be to have this window in your office??

I have always loved a window seat. I love a window seat on a landing even more! And the fact it is an oval- OY!!

Great nautical style bathroom! I love how the Oval Window has a custom cover!

This is such a beautiful shot. I love how they have used darker trim for added emphasis.

How quaint is that window up at the top of the peak! It is so sweet!

I think this is one of the loveliest benches I have ever seen. I love how they have disguised heating in the bench with screening for ventilation. The gray just adds to the overall softness. And the Trim!!! Oh-and the window is pretty awesome too!

What can I say about this except- Yes please! The trim, windows and roof line all make for an amazing elevation.

You don't see that too often- an Oval Window that can open! Imagine!

This is one instance where I think white trim is called for- it contrasts beautifully with the green siding. I am usually a big fan of trim that is painted some other colour than white.

Absolutely gorgeous. That eyebrow window and the two flanking oval windows give this front exterior a really great elevation.


How lovely is that Oval window in that gorgeous kitchen?


I just love an Oval Window in a stairway! Don't you?? It looks especially good here. Such a lovely shot!

Very fancy! But I have to say that there is a lot of classic details here- the Oval Window of course, the black and white floor, the curving staircase. All amazing!


I think what really caught my eye here is the window, the trim and the colour of the room. This wall colour is one of my favourites- looks something like Wythe Blue HC-143 B/M maybe??
Well that's just a few great examples of Oval Windows. Now if only I can find a window that fits not only my house but fits my budget!!
Have a great day everyone!!
Megan


